
Tongue Posture Exercise: A Simple Guide to Practice at Home
Tongue posture refers to the resting position of the tongue against the roof of the mouth. This exercise is designed to help you become more aware of your tongue position and practice maintaining that posture while gently opening and closing your mouth.
The goal is not to complete as many repetitions as possible. Instead, focus on accuracy, control, and maintaining the correct posture throughout the movement.
Step 1: Activate the Tongue With a “Click”
Start by placing your tongue against the roof of your mouth.
Try creating a gentle clicking sound by pressing the tongue upward and then releasing it. This can help you recognize the feeling of suction between the tongue and the roof of your mouth.
The goal is to become familiar with the sensation of the tongue being held upward rather than simply touching the roof with the tip.
Step 2: Feel the Tongue Press Up While Swallowing
Next, place your tongue on the roof of your mouth and swallow.
Pay attention to how the tongue presses upward during the swallow. You may also notice a dome-like shape developing underneath the tongue when the tongue is properly elevated.
If helpful, practice this step in front of a mirror so you can observe the area underneath your tongue.
Step 3: Combine the Swallow and Suction Hold
Once you are comfortable with both sensations, combine them.
Place your tongue on the roof of your mouth.
Begin a gentle swallow.
Pause partway through the movement.
Use the suction sensation from the earlier “click” exercise to help keep the tongue against the roof of your mouth.
The aim is to maintain contact with the roof of the mouth using the whole tongue, rather than relying only on the tip.
Step 4: Open and Close While Maintaining the Posture
With your tongue maintained against the roof of your mouth, slowly open and close your mouth.
Try to keep the tongue in position throughout the movement.
It is important to keep your head and neck neutral. Avoid tipping your head backward or moving into neck extension as you open your mouth.
Move slowly and with control.
Key Reminders
Practice in front of a mirror when possible.
Look for a gentle dome-like shape underneath the tongue when the posture is maintained.
Focus on keeping the full tongue, not just the tip, against the roof of the mouth.
Keep your head and neck in a neutral position.
Do not compensate by tilting your head backward as you open or close.
Quality is more important than repetition.
If you lose the posture, reset and start again rather than forcing the movement.
The Goal
This exercise is primarily about developing awareness and control.
Take your time to understand the sensation of tongue elevation, swallowing, suction, and maintaining the posture during jaw movement. A smaller number of well-controlled repetitions is generally more useful than repeatedly performing the exercise with poor form.
Disclaimer
This exercise is provided for general educational purposes and is not intended to replace an individualized assessment, diagnosis, or treatment plan. If you experience pain, new or worsening symptoms, or have concerns about whether this exercise is appropriate for you, stop and consult your regulated health professional.
Han Yu Cheng Chiropractic
Thorough Assessment. Clear Understanding. Personalized Care.
make psoas stretch into a blog post
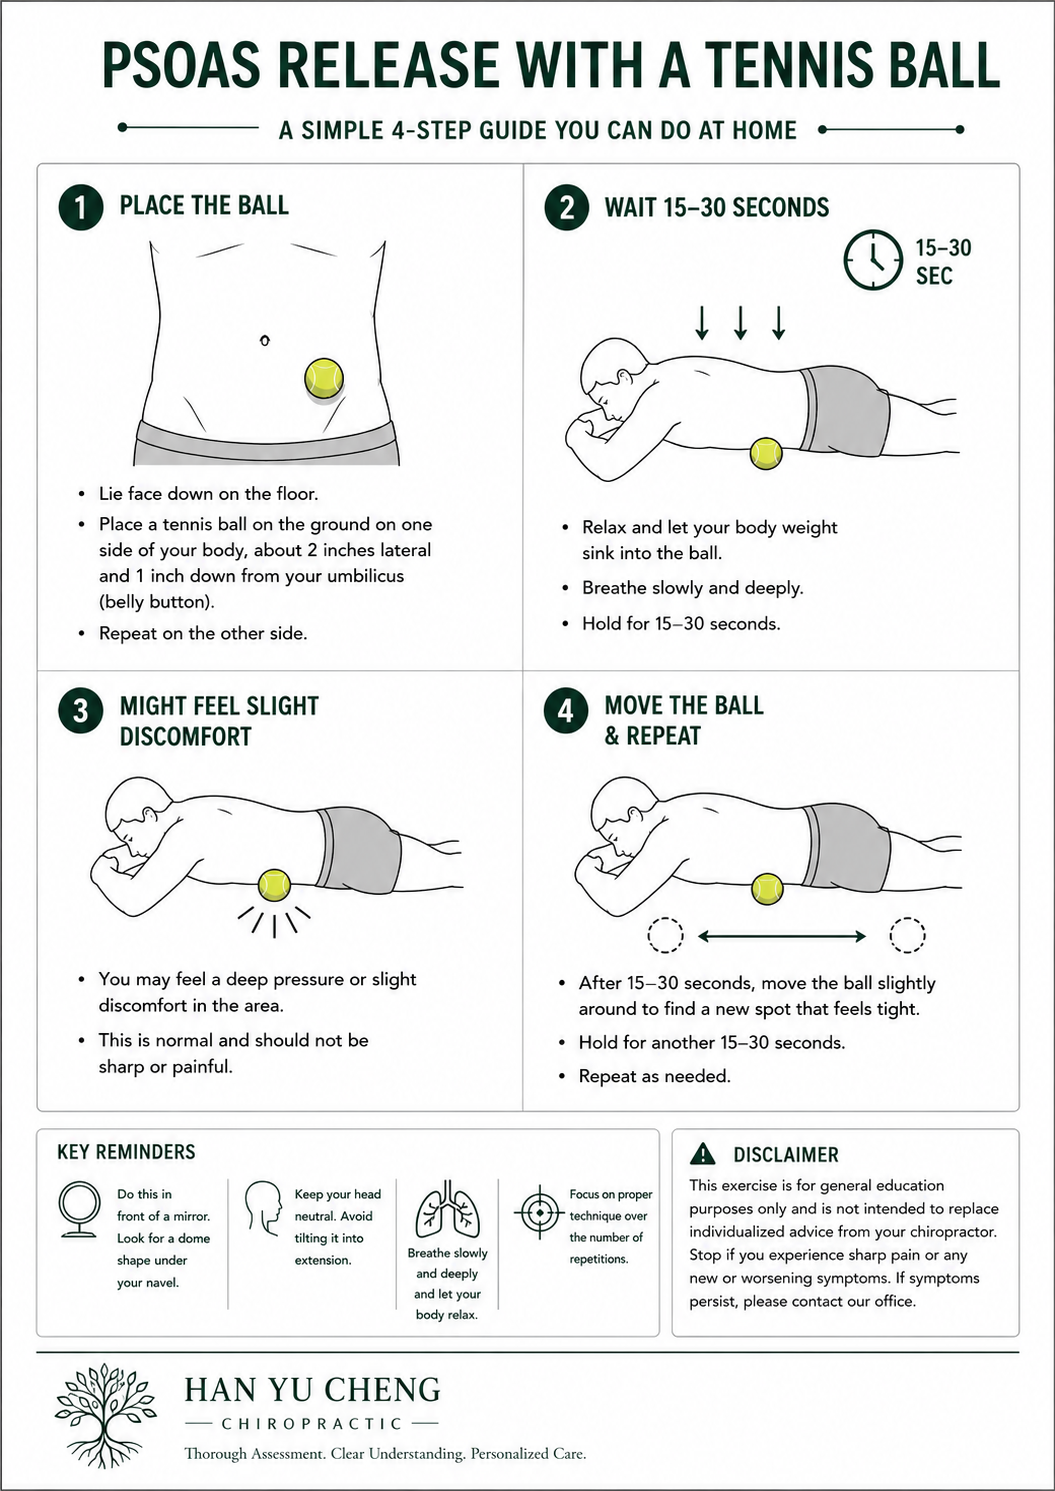
Psoas Release With a Tennis Ball: A Simple Guide to Practice at Home
The psoas is a deep muscle located at the front of the hip and abdomen. Because of its location, it can be difficult to access directly.
This exercise uses a tennis ball to apply gentle pressure to an area of the abdomen. The goal is to explore the area slowly and comfortably rather than forcefully pressing into it.
The exercise should not cause sharp or significant pain.
Step 1: Position the Tennis Ball
Place a tennis ball on the floor.
Lie face down with the ball positioned on one side of your abdomen.
Start approximately 2 inches to the side of your belly button and 1 inch below it.
Allow your body to gradually settle onto the ball.
There is no need to force your body weight down. Start gently and allow yourself time to adjust to the pressure.
Step 2: Wait 15–30 Seconds
Once you have found a comfortable starting position:
Relax your body into the ball.
Breathe slowly and normally.
Allow your body weight to gradually settle.
Stay in that position for approximately 15–30 seconds.
Try not to tense your abdomen or hold your breath.
Step 3: Mild Discomfort May Be Present
You may notice:
Deep pressure
Tenderness
Mild discomfort
A sensation of tightness
The sensation should remain tolerable.
Stop the exercise if you experience sharp, severe, or worsening pain.
The goal is not to push through discomfort. Allow your body to relax and use the pressure as a way to explore the area gently.
Step 4: Move the Ball and Repeat
After 15–30 seconds:
Slowly shift your body to move the ball slightly.
Find another nearby area that feels tight or tender.
Pause again for 15–30 seconds.
Continue slowly as tolerated.
Repeat the process on the other side if appropriate for your exercise instructions.
Small adjustments are usually enough. There is no need to move the ball a large distance.
Key Reminders
Start gently.
Breathe slowly and avoid holding your breath.
Do not force your body weight onto the ball.
Mild pressure or discomfort may occur, but the exercise should not be sharply painful.
Move the ball gradually to explore nearby areas.
Focus on relaxation rather than intensity.
Quality and comfort are more important than how long or how many positions you complete.
A Note About Technique
This exercise is not about finding one exact “perfect” spot and applying as much pressure as possible. The starting position provides a general reference point, but small adjustments may change how the pressure feels.
Move slowly, pay attention to your body's response, and stay within a comfortable range.
Disclaimer
This exercise is provided for general educational purposes and is not intended to replace an individualized assessment, diagnosis, or treatment plan. Stop if you experience sharp pain or new or worsening symptoms. If you are unsure whether this exercise is appropriate for you, consult your regulated health professional.
Han Yu Cheng Chiropractic
Thorough Assessment. Clear Understanding. Personalized Care.
